bonanza golf course, peter matkovich, matko, zambia, lusaka, golf

Proudly a Peter Matkovich Design

344 306 278
Par 4 | Stroke 14
bonanza golf course lusaka zambia hole 1

Hole 1 - "Bittersweet"

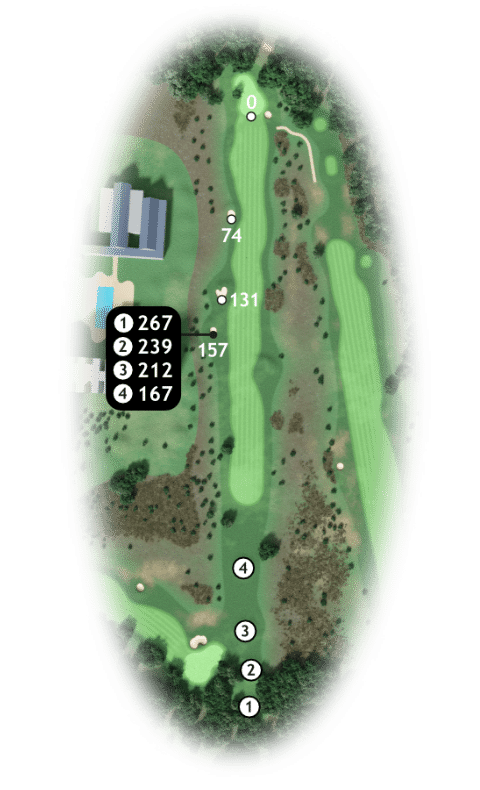
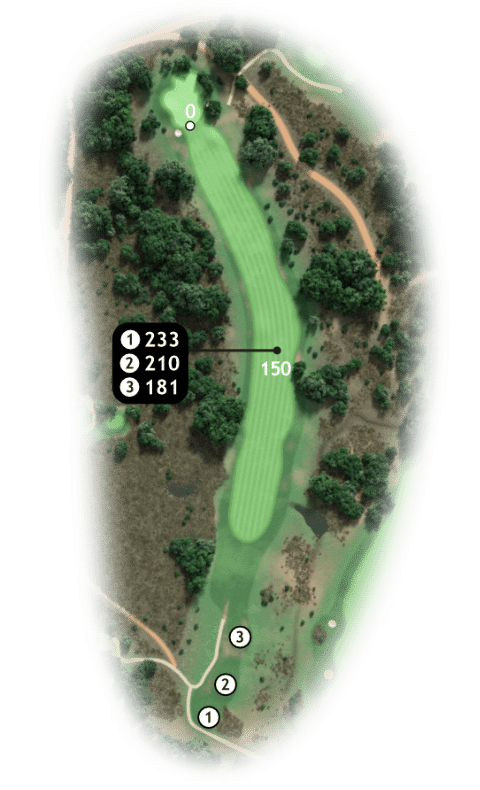
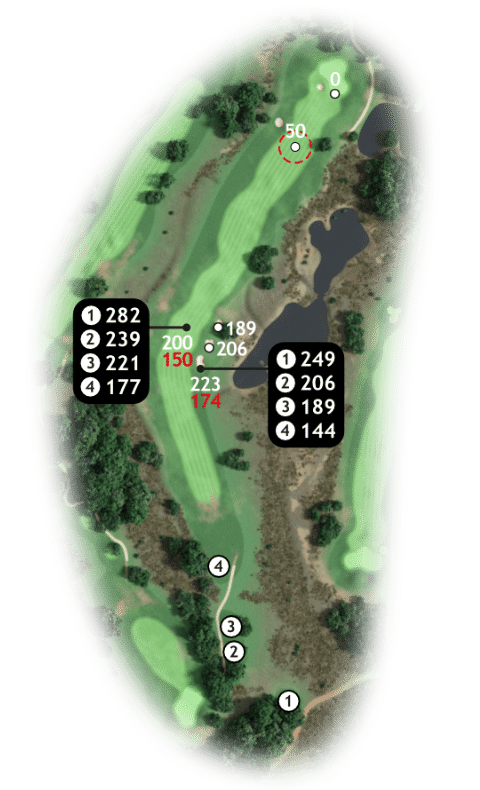
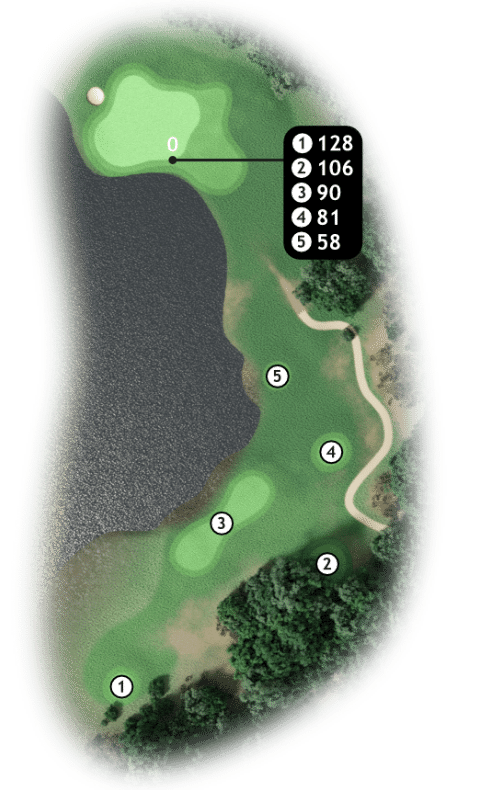
Don’t let the wide open space fool you! While this hole is relatively trouble free, anything lost to the right will leave you with a punch out sideways 90% of the time.

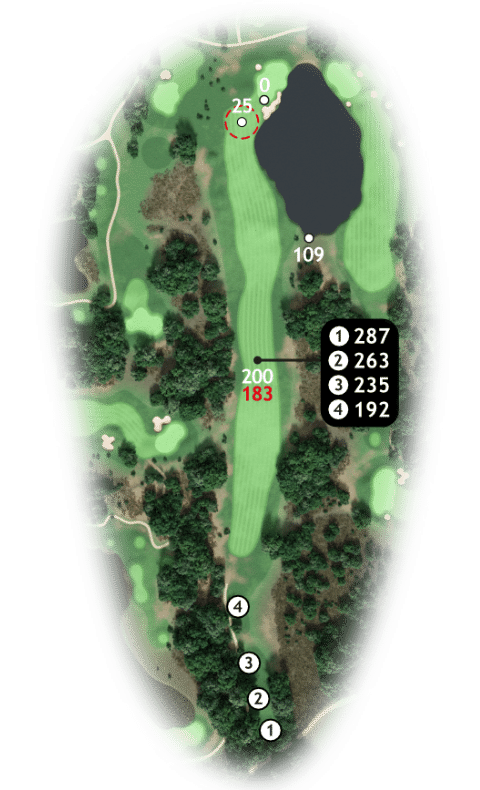
Pin locations right of centre give you the green light to knock it as far down the fairway as you can, although the fairway does narrow down for longer hitters.

For pins located left of centre, you are better off laying up with a long iron or hybrid off the tee, leaving a full shot in with loads of spin. Don’t let greed leave you with a bittersweet taste on the opening hole!

FLYOVER COMING SOON

409 382 336
Par 4 | Stroke 9
Bonanza Golf Course, Lusaka, Zambia, Hole 2

Hole 2 - "Mphamvu"

Mphamvu – translated from Nyanja to English gives you “Power” … and you’ll need lots of mphamvu on this demanding par 4. Not only is it long, it is also one of the more narrow holes on the course.

Favor the right side as there are bunkers and out of bounds to the left. A solid strike is needed for your approach shot.

Anything less and you could risk landing in grass mounds to the right of the fairway which are very much in play.

The green is generous in size but has subtle breaks, focus on your speed and trust it.

FLYOVER COMING SOON

509 493 425
Par 5 | Stroke 5
zambia_lusaka_bonanza_hole_3

Hole 3 - "Puku"

This hole is shaped like a horn from Zambia’s medium-sized antelope found in the grasslands, the puku. With the wind almost always into and from the right, this par 5 rewards those who plot their way carefully.

Often players who attempt to “smash” their tee shot end up hitting high spinning shots caught up in the wind.

Opt for a smooth tempo off the tee that flights one low into the wind and finds the fairway. This is a 3 shot hole for most. A layup toward the 100m marker gives you a wide landing area and a good chance at firing one in close.

A fairly big green and all pin locations are easily accessible with the exception of back left where caution must be taken.

FLYOVER COMING SOON

460 431 400
Par 5 | Stroke 3
Bonanza_Lusaka_Zambia_hole_4

Hole 4 - "Magnet"

Another par 5 where the wind is normally straight into you! The hole can play short depending on which tees are used. Whether long or short, one thing will never change and that’s the MAGNET. A huge body of water extends from around the 200m marker all the way to green – a magnet to many golf balls.

MAGNET has made even the sweetest swingers shiver! If played as a three shot par 5, favor the right side of the fairway with your tee shot, ensuring you use a club keeping you short of MAGNET. This allows you to hit away from MAGNET for your second, a simple layup.

Big hitters have plenty of options on this tee so have your game plan and stick to it. Relief is provided as you reach the green which is the biggest on the course. Be careful when you are above the hole as it is surprisingly quick.

FLYOVER COMING SOON

148 118 97
Par 3 | Stroke 17

Hole 5 - "Pulse Check"

Playing anything from 80m to 180m, this beauty of a hole will get your heart racing even from the time you are selecting your club! The green is bigger than it looks from the tee.

MAGNET is still very much in play and even a slightly skewed shot to the right will end up wet. Short left is the conservative play here and not a bad option if you are playing from the back tees.

FLYOVER COMING SOON

330 299 271
Par 4 | Stroke 7

Hole 6 - "Rhino Horn"

Named after a tree to the right of the fairway that looks just like a rhino horn, hole 6 provides some much needed relief after holes 4 and 5. If you can get to this point damage free you have a good day of scoring ahead of you.

The landing area widens the further you hit your tee shot and there is ample space beyond the mound to the left so you can be aggressive here.

The green slopes a fair amount from back to front so if you are above the hole you’ll have a quick putt.

FLYOVER COMING SOON

403 376 346
Par 4 | Stroke 1

Hole 7 - "Diamond"

Statistically the hardest hole on the course. An intimidating tee shot awaits you on this dogleg left par 4. While the hole shape favors a draw, faders of the ball should not fight their natural ball flight.

Aim it for the left half of the fairway and your natural fade will be held up with the wind leaving you dead centre. The second shot is not easy and plays slightly uphill. A unique green complex which has a serve dip in the middle of it.

Better players can use the slope to their advantage depending on pin locations and let the undulation do the work for them. For most of us, the middle of the green is the target everyday!

FLYOVER COMING SOON

180 155 140
Par 3 | Stroke 15

Hole 8 - "Longitude"

One of the biggest greens on the course, but it certainly does not look that way off the tee. 22 paces from front to back and a massive 36 meters from left to right there is plenty of dancefloor here!

Don’t be shy, pick your club knowing that even if you are slightly off, you should be there or thereabouts.

The key is selecting the right club and making a confident swing.

FLYOVER COMING SOON

281 261 235
Par 4 | Stroke 11

Hole 9 - "Temptation"

This is a prime example of what a risk and reward par 4 should offer. There is a massive landing area around 110m short of the green and if found, this will leave you with a simple approach shot.

But, can you resist the temptation of knocking one on the green? Even for the shorter hitters it’s possible to get it close, but this aggressive option brings the water to the left into play. Anything pushed out the right will also leave you with a tricky second.

Your lie will be a lottery ticket and any approach that comes out hot will run through the green into the water. The stats show that this is one of the easier holes on the course. However, the emotion we’ve witnessed at the halfway house shows that the temptation is real and risk is sometimes punished.

FLYOVER COMING SOON

344 317 286
Par 4 | Stroke 10

Hole 10 - "Shallow"

A straightforward hole that has nothing to hide. Once the fairway has been found, attention to detail on your yardage is required as this is not a very deep green, especially if the pin is located to the right.

The green is slightly elevated, keep that in mind if you finish short of it as you may need to open the face to get the added height for a soft landing.

FLYOVER COMING SOON

183 162 149
Par 3 | Stroke 18

Hole 11 - "Beastly Easterly"

This par 3 is an absolute beast when the easterly wind blows into you. It can play as long as 210m to back pins, add another 30m to that if the wind is howling! The green is bigger than what you see and your keyword here is “strike”.

Any weak strike will fall woefully short so keep the rhythm smooth and find the middle of the clubface. There are undulations to the left and right of this green which can leave you with an awkward lie when chipping.

The green is receptive and has a significant slope. Uphill is super slow, down hill is super fast.

FLYOVER COMING SOON

484 449 392
Par 5 | Stroke 2

Hole 12 - "Boomerang"

Shaped like a boomerang, and at times you may wish your ball would come back to you like one for a mulligan.

But with smart play off the tee, you can manage this hole. There is trouble all the way down the right with a monstrous water feature that extends all the way to the green.

Once you have the tee shot out the way the hole opens up and presents a very different looking green with a host of hole location options.

Front pins are difficult to get to, so add a few extra metres and shoot for the middle – no trouble there!

FLYOVER COMING SOON

165 139 99
Par 3 | Stroke 14

Hole 13 - "Deception"

Another par 3 that can play anywhere between 90m and 200m. The shape of the green is very similar to the 12th green HOWEVER, what is completely different is the tree line. What does tree line have to do with on a par 3???

It hides the wind, thus the name “DECEPTION”. 99% of the time the wind will be into and off the right, don’t forget to factor that in. If you miss it short left you are presented with a challenging up and down where the green will be above you.

FLYOVER COMING SOON

397 362 309
Par 4 | Stroke 12

Hole 14 - "Momentum"

Hole 14 is a tough hole, yet so many golfers simply hit and hope off the tee and just take it from there. This is a huge momentum hole. There are four great scoring opportunities after this, you want to go into those holes with MOMENTUM or at least holding the momentum you have!

Pick your landing area off the tee which is fairly wide. Again factor the wind. The green is a similar shape to hole 8 and the same advice applies. Be confident with your club selection and go for it!

If the wind is up, take one club less, swing it easy for a nice low flight. There is no serious trouble short of the green so a low runner can get the job done here.

FLYOVER COMING SOON

507 479 435
Par 5 | Stroke 5

Hole 15 - "Black Maamba"

With a dog leg left and and then a curve to the right, this is a slithery hole. Most players will play it in three shots. You’ll need to take care when laying up as this slithery number narrows at points, just like a MAMBA’s body contorting when it devours its prey.

Big hitters can get home in two shots and any miss should be to the right, left will be dead.

You won’t see much of this green as you approach as it is protected by a large, raised bunker on the left.

Putting uphill is generally slower than you think on this hole.

FLYOVER COMING SOON

582 522 470
Par 4 | Stroke 14

Hole 16 - "Amen Corner"

On holes 16, 17 and 18 anything can happen, and this is certainly Bonanza’s “AMEN CORNER”. Tackled correctly, these holes could have you walking off the course grinning from ear to ear. If not, you may just walk off 18 asking yourself “what just happened?”.

There are a variety of teeing areas which give different angles to the hole. It is a confidence shot and another where the wind is usually into you.

If you have time to warm up before you round it is useful to practice a few knock-down shots which will come in handy for the back nines par 3’s.

FLYOVER COMING SOON

266 250 220
Par 4 | Stroke 8

Hole 17 - "Braveheart"

Another exceptionally well designed risk and reward hole that will get the pulse racing! Again, even the shorter hitter has a chance to get their tee shot close to this green and we have had two hole in ones here.

Our advice, take the risk if you have had a solid ball striking day and can trust the shot shape you have been hitting.

If not, it’s an easy layup where you should favor the right half of the fairway.

This opens up the green, gives you a simple approach shot and hopefully a safe chance at birdie.

FLYOVER COMING SOON

483 455 410
Par 5 | Stroke 6

Hole 18 - "Timebomb"

As we know, so often it all comes down to the last hole. The clock face on the clubhouse is ticking away but it doesn’t have to be a timebomb. Instead, use it to your advantage as it is the perfect aiming point from the tee.

Big hitters can get up in two shots here but it is an intimidating shot to pull off as water hugs the right side.

For those playing in three strokes, be sure to get your numbers right else this bomb will explode! Often players are deceived visually and end up laying up in the water!

Any layup that leaves you around 100m to the green should be safe.

Once you’ve eventually holed out, make your way to the 19th hole and enjoy a Rebel Craft beer, home brewed on site at the Bonanza Brewing Company.

FLYOVER COMING SOON